Monday, September 24, 2012

Avocado Quick Bread

So many avocados, so little time...
We recently came into possession of about a dozen home-grown avocados - normally a very happy occasion but when confronted with so many that ripened all at the same time, of course, I've been struggling to find ways to use them that are deserving of their deliciousness. There has been a lot of guacamole happening around here, but at a certain point I knew I had to figure out how to bake with them.

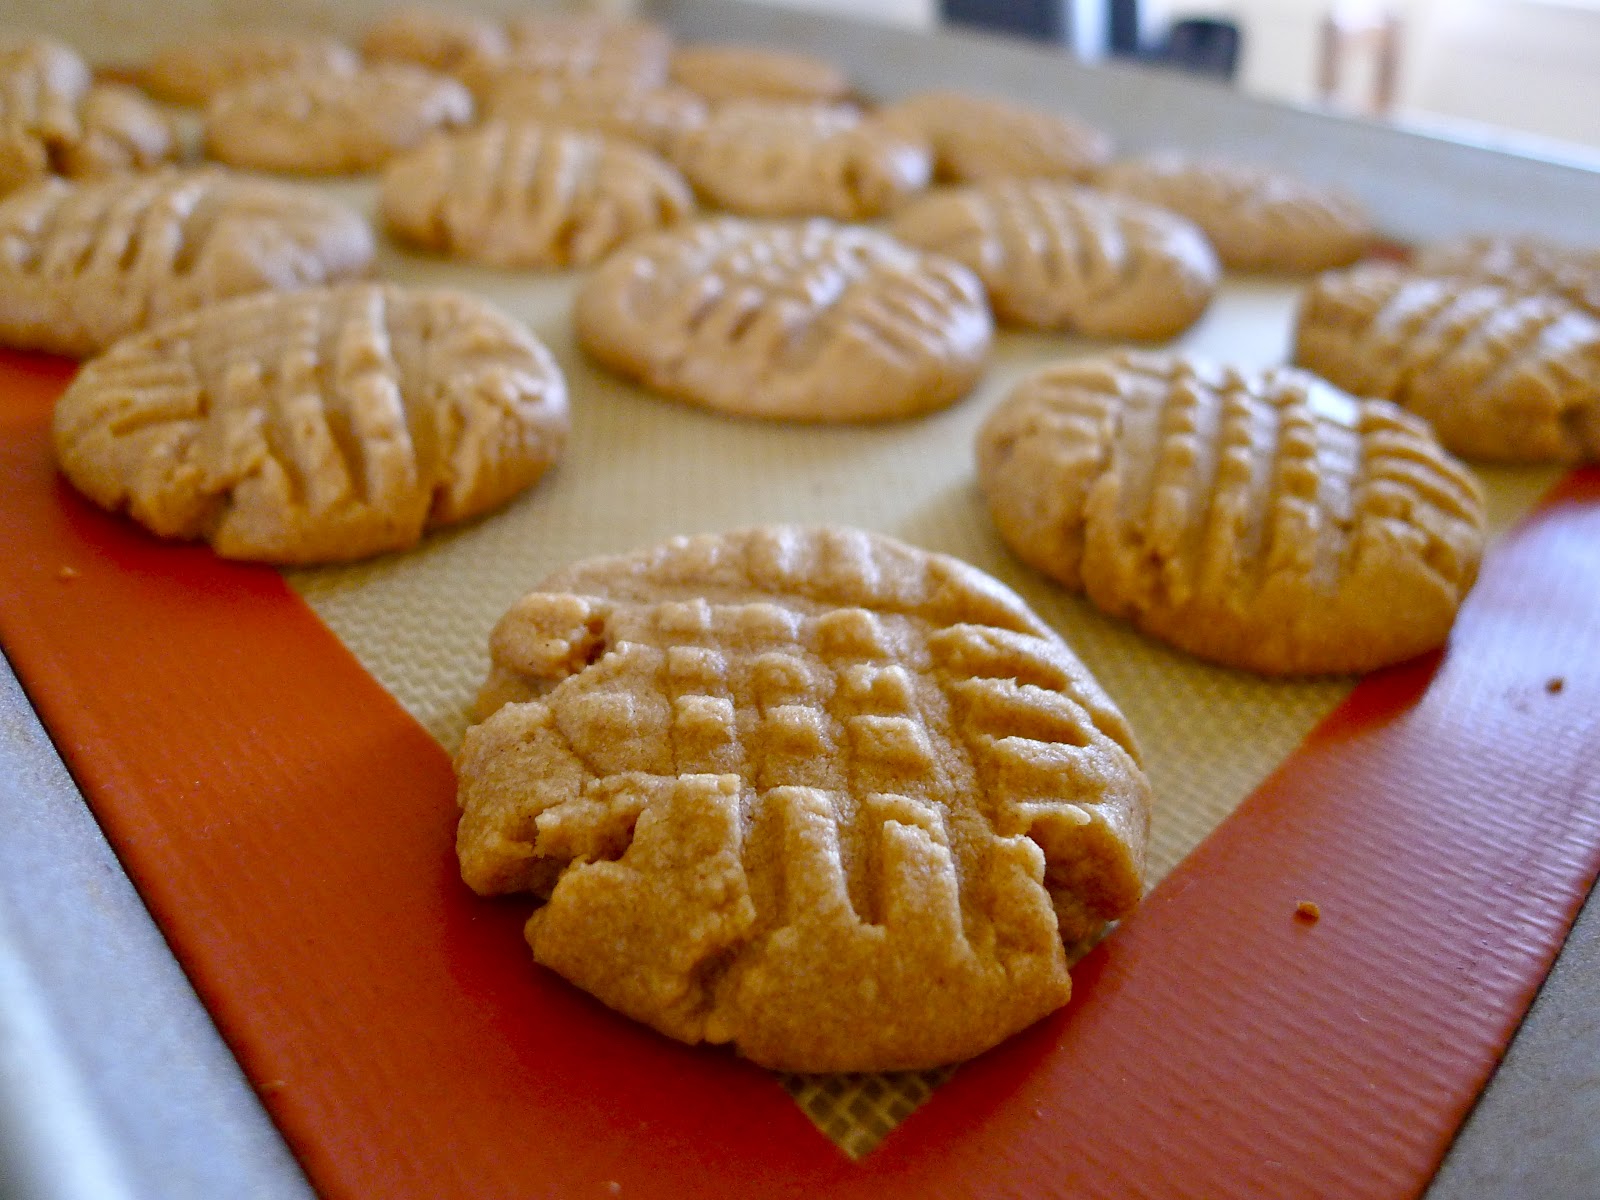
A while back I wrote about making chocolate chip cookies with avocados, and I experimented again with several variations this time around as well. The best combination? Replace 1/2 C of butter in my perfect chocolate chip cookie recipe with 1/2 C of mashed ripe avocado, and mix and freeze as usual. Bake frozen dough balls at 350F (instead of 375F) for 15 minutes. Voila! (Semi)healthy and extra tender chocolate chip cookies.

I also had a hankering for a slice of a good quick bread (like banana, pumpkin or zucchini loaves), but wanted to see what could be done with avocados instead. Luckily I stumbled across this awesome recipe and with a few tweaks made a lovely loaf that is tender with a perfect crust, slightly sweet and has just a hint of warm fall spices.


If you're hesitating to use avocado in baking, fear not! With these two recipes you'll wow your friends with your creativity and daring, and maybe unclog a few arteries in the process.

Avocado Quick Bread
Adapted from Fleur-De-Licious

1 C all-purpose flour
1 C whole wheat pastry flour
1 1/2 tsp baking powder
1/4 tsp baking soda
1/4 tsp salt
1/2 tsp cinnamon
1/4 tsp nutmeg

2 ripe avocados, mashed
3/4 C granulated sugar
2/3 C vegetable oil
1 tsp vanilla extract
2 eggs
1/2 C buttermilk (or 1/2 C milk with 1/2 Tbsp white vinegar)

Directions: Preheat oven to 350F and prepare a loaf pan with nonstick spray.


Whisk together flours, baking powder, baking soda, salt, cinnamon and nutmeg and set aside.
With a whisk or electric mixer, cream together avocados and sugar until well blended. Add oil and buttermilk and mix to combine. Add eggs and vanilla and mix to combine.
Gradually add in dry ingredients and mix until just combined.

Pour batter into loaf pan, then bake for 45-50 minutes until the top is golden brown and a toothpick in the center comes out clean. Remove from oven and let cool in the pan for 15 minutes, then finish cooling on a wire rack. Serve drizzled with honey, spread with butter, or even with jam!

Keep the loaf in an airtight container at room temperature for a few days, or freeze for longer storage.


Tuesday, September 4, 2012

Cherry Cornmeal Upside Down

I'm sure you know the story - girl goes to Costco, girl sees beautiful sweet red cherries, girl buys WAY too many. There's only one logical solution, and that's to find a glorious recipe to use them up!


I love the drama of upside down cakes, but most recipes end up making a topping that's sticky sweet and overwhelms any other flavors in the cake. When I found this recipe (originally for apricots), I knew it was something special. The cornmeal and whole wheat pastry flour add some heft to the cake itself, but the result is still very moist and tender with the brightness of lemon. I cut the brown sugar in the topping down so the cherry flavor could shine through, so if you want something more intense you can double the amount.

This is the perfect brunch or tea-time treat, not too sweet but showcasing flavors of whatever fruit you choose to include. What a lovely discovery!

Cherry Cornmeal Upside Down Cake
Adapted from Sinfully Spicy
Makes one 8" cake

~2 C Bing or other sweet cherries
1/4 C brown sugar
1 C whole wheat pastry flour or AP flour
1/2 C granulated sugar
1/2 C cornmeal (I used Bob's Red Mill stone ground corn flour)
1 1/4 tsp baking powder
1/2 tsp baking soda
1/2 tsp salt
3/4 C buttermilk (or 3/4 C milk + 2 1/4 tsp white vinegar)
2 eggs
2 Tbsp butter, melted
3 Tbsp vegetable oil
1 tsp vanilla extract
grated zest of 1 lemon

Directions: Preheat oven to 350 degrees. Grease one 8" cake pan with butter or nonstick cooking spray. Wash cherries, then cut them in half and pit them.

Spread brown sugar evenly along bottom of cake pan. Place cherries cut side down in concentric circles on top of the sugar layer so the entire surface is covered.


Whisk together flour, granulated sugar, cornmeal, baking powder, baking soda and salt in a large bowl. Whisk together buttermilk, eggs, butter, oil, vanilla and lemon zest in another small bowl. Add wet ingredients to dry, then fold gently together with a spatula until combined.

Pour cake batter over the cherries in the pan, and use spatula to even out the surface. Bake for 30-35 minutes until top is lightly browned and a toothpick in the center comes out clean. Let the pan sit on a wire rack for 10 minutes before running a knife around the edge and turning the cake out onto the rack to cool completely.

Plain...

Just plain delicious!

Sunday, August 12, 2012

Celebrating with Extraordinary Cakes Lemon Ricotta

There are times when it's absolutely appropriate to spend a week making a complicated and multi-layer cake, and I decided that my 23rd birthday was one of those occasions. I love excuses to break out the expensive bottle of wine I've been saving, wear my favorite dress and get my best friends together to enjoy a beautiful day. This Lemon Ricotta Cake was my favorite treat when I worked at Extraordinary Desserts in San Diego, and I was excited to see it in Karen Krasne's Extraordinary Cakes cookbook.


Ricotta cake is brushed with lemon simple syrup, then layered with lemon whipped cream, lemon curd and fresh blueberries and blackberries and topped off with lemon buttercream frosting. This dessert is pillowy and creamy with contrasting sweet and tart, the perfect way to celebrate a summer day.

The recipe calls for making the lemon curd from scratch, but you could easily use store-bought. The hardest part of the recipe is orchestrating the many components and making sure they're ready at the right times during the assembly process. I won't even try to reprint the multi-page recipe here, but when you buy the book (because you should!) make sure you read through everything multiple times so you have the complete picture.


Tuesday, July 24, 2012

Chocolate Pot de Creme with Pistachio Shortbread

Around these parts, there's a grocery store that's famous for good food. Bi-Rite Market is a neighborhood institution known for its carefully chosen, locally-made, organic foods of all kinds, and I always walk out with a smile on my face and something absolutely delicious in my bag.

One of their awesome creations is particularly drool-worthy, though unassuming in its small plastic container, and seems to always work its way into my shopping basket. Chocolate Pot de Creme is somewhere between mousse, ganache and pudding and can be made into elegant individual desserts or saved for a late night pajama craving. Luckily for me (and you), Bi-Rite recently published a book called Eat Good Food, describing the best ways to shop, store and prepare your food, and it includes this recipe!


The ingredients aren't complicated, but make sure that you get good quality chocolate - no Hershey's here! For budget shoppers I suggest Trader Joe's pound plus bars, or if you want to splurge pick up some Scharffen-Berger or Tcho. Dark chocolate (70-75%) will make a sinfully rich and deep flavor, while milk chocolate (60-65%) will be significantly lighter and more pudding-like. I used 4-oz canning jars, but you can use tea cups, small bowls, even martini glasses as the mood strikes you!

And what's better to accompany your pot de creme than the light, buttery crunch of pistachio shortbread? They're the perfect sidekick with a contrasting texture and complementary flavor, and taste fantastic with your coffee the next morning. Elegant but simple, they're the best cookies I've made in a long time.

Chocolate Pot de Creme
From Bi-Rite Market's Eat Good Food
Makes 8 4-oz servings

6 oz semisweet or dark chocolate, chopped
2 C heavy whipping cream
3/4 C + 2 Tbsp half and half
1/8 tsp salt
6 Tbsp sugar
9 egg yolks (freeze the egg whites to use later!)
1/2 tsp vanilla extract
Fresh whipped cream and/or shaved chocolate for garnish

Directions: Place chopped chocolate in a large heatproof bowl and set aside. Combine egg yolks and 3 Tbsp sugar in a medium bowl and whisk until smooth, then set aside. Combine cream, half and half and 3 Tbsp sugar in a medium saucepan and cook over medium-high heat, stirring occasionally until just before it simmers (small bubbles appear around the edge of the pan).

Pour about a cup of the hot cream mixture into the egg yolks while whisking constantly, then pour yolk mixture back into the saucepan and whisk constantly until smooth. Put the pan back onto medium-high heat and cook, stirring constantly, for 2-3 minutes until the mixture has the texture of pureed soup.

Pour cream mixture over chocolate and let sit for 3-5 minutes. Slowly and gently stir with a whisk until smooth, being careful not to incorporate air. Add vanilla and stir to blend.

Pour mixture through a fine strainer into a measuring cup, then divide among containers. refrigerate, uncovered for 2 hours and then wrap tightly and refrigerate for at least another 4 hours before serving. Let the pots de creme sit at room temperature for 15 minutes before serving. To store longer, you can freeze the containers.

Pistachio Shortbread
From Bon Appetit, via Epicurious
Makes about 36 cookies

1 1/2 C all-purpose flour
1/2 C + 2 Tbsp powdered sugar
1/2 tsp salt
3/4 C (1 1/2 sticks) butter, chilled and cut into 1/2 inch pieces
1/2 C roasted, unsalted pistachios
1 egg yolk
3/4 tsp vanilla extract

Directions: Chop pistachios in a food processor into a coarse meal. Set aside. Mix together flour, sugar and salt using the food processor. Add butter, pistachios, egg yolk and vanilla and pulse until ball of dough forms. Divide dough into two parts, and roll each into a log about 1 1/2 inches in diameter. Wrap with plastic wrap and refrigerate for 4 hours, or until firm. (At this point you can freeze the dough for later)

Preheat oven to 325 degrees. Prepare a baking sheet with parchment. Slice logs into 1/4 inch thick pieces, re-rolling if necessary to reshape. Place on baking sheet about 1 inch apart and bake until lightly golden, about 18 minutes.

Thursday, July 5, 2012

Lemon Berry Cheesecake

The warmth and crunch of a graham cracker-pistachio crust is perfectly contrasted with the creamy cloud of light lemon cake dotted with pops of roasted blueberry, and topped with the crisp sweetness of fresh strawberries. Are you listening? 

There's only one possible color scheme for Fourth of July dessert. This year, I created a cheesecake that ranks among the best desserts I've ever made - and I can't wait to share it with you! My audience was rather skeptical about the lack of cream cheese ("How can it be cheesecake...?") but everyone was very impressed with the light, creamy texture of the finished product. I believe it's marginally healthier than the traditional recipe, but you should choose this cheesecake simply because it is FANTASTIC.

If you're not experienced with baking cheesecakes, all you need are the right tools and a few guiding principles. You definitely need a springform pan, with a detachable ring around the sides to allow full release of the cheesecake when it's cooled. Also make sure you have some heavy duty aluminum foil and a roasting pan for the water bath when you're baking it. The rest is... cake.


Lemon Berry Cheesecake
Makes one 8" cheesecake

Graham Cracker-Pistachio Crust
9 graham crackers
3/8 C dry roasted unsalted pistachios
6 Tbsp melted butter (3/4 stick)
1/8 C + 1 Tbsp granulated sugar

Directions: Preheat oven to 375 degrees. Pulse graham crackers and pistachios in a food processor until finely and evenly ground. Add sugar and pulse to combine. Add melted butter in small increments until mixture is moist and sticks together but doesn't ooze butter (you may not use all of the butter). Press crust into bottom of springform pan with your fingers to form an even layer. Bake for 7 minutes, remove and let cool completely.

Lemon Cheesecake
1 C fresh blueberries (or frozen fresh)
12 oz ricotta cheese
12 oz mascarpone cheese
6 oz greek yogurt
3/4 C granulated sugar
4 eggs
1 1/2 Tbsp all-purpose flour
Finely grated zest of 1 lemon
Juice from 1/2 lemon
1 1/2 tsp vanilla extract
3/4 tsp salt

~10 fresh strawberries for decoration

Directions: Preheat oven to 375 degrees. Spread blueberries onto baking sheet lined with foil, and roast for about 8-10 minutes until berries start to pop and release their juices. Remove from oven and set aside.

With an electric mixer, blend together ricotta, mascarpone, greek yogurt until smooth. Add eggs one at a time, blending between. Add sugar, flour, lemon zest, lemon juice, vanilla and salt and combine completely. 

Wrap the cooled springform pan with heavy duty foil and place in roasting pan. Add water until the line reaches ~1/3 the height of the springform. Pour cheesecake mixture on top of cooled crust. Add roasted blueberries by small amounts on top, and swirl once or twice with a spoon to distribute them (they will sink to the bottom but leave some flavor throughout). 

Bake for 50-60 minutes, until the cake is set in the center (not liquid, but still jiggly). It will brown lightly on top, so cover the cake with foil after 30 minutes if you want to keep it light. When it's done, turn oven off and let the cake sit in the oven for 1 hour to set completely. Remove and let cool completely. Refrigerate for several hours or overnight before decorating and serving.

To decorate, wash and hull strawberries and slice them lengthwise. Arrange along the circumference of the cake, starting with the outside edge and moving inwards. If you have extra strawberries, puree them in a food processor and serve the fresh sauce with the cheesecake!


Saturday, June 9, 2012

The Best Blueberry Scones


To be honest, when I picked out this recipe I didn't expect to find the best of anything! It was a late night after a long day at work, but I wanted to bring a treat to work the next morning as a thank you to my fantastic mentors/coworkers for this past month at my clinical internship. There are fresh blueberries galore in the house, and they clearly had to make a cameo in whatever I put together.


Scones are one of the most delicious additions to breakfast or afternoon coffee, and I've played around with a lot of different recipes and techniques with varied success. But of any of those, this recipe is by far the easiest and most delicious! Light and buttery crumb with a golden edge, balanced with sweet bursts of berries, you won't be able to stop at one. Lucky for you, they're easy enough to whip up any night of the week!


Note: I decided to make these as "drop scones," meaning you don't have to roll them out and cut them - just drop the dough onto the baking sheet! It's a bit of extra work and a lot more flour all over the kitchen to follow the original recipe, but if you're not one for shortcuts I'm sure it would be just as delicious.


Blueberry Scones
Recipe adapted from Joy of Baking
Makes about 9 scones

2 C all-purpose flour
1/3 C granulated sugar
2 tsp baking powder
1/8 tsp salt
6 Tbsp chilled butter, cut into pieces
1 C fresh or frozen blueberries
1 egg, beaten
1 tsp vanilla extract
1/2 C buttermilk (homemade: 1/2 C milk with 1/2 Tbsp white vinegar)
Raw turbinado sugar (for topping)

Directions: Preheat oven to 400 degrees. Line a baking sheet with parchment paper.

Whisk together flour, sugar, baking powder and salt. Blend butter into flour mixture using pastry cutter or forks, until the mixture looks like coarse crumbs. Gently fold in blueberries. Add beaten egg, vanilla and milk and gently mix until just blended. 

Drop about 1/3 C of dough for each scone spaced evenly on the prepared baking sheet. Sprinkle turbinado sugar on top of each scone if desired. Bake for 18-22 minutes, or until scones are just golden. Let cool before enjoying.


Summer Strawberry Cupcakes

There's no better way to celebrate the return of summer than with a Memorial Day BBQ. After debating what to contribute to the feast, I realized there was only one solution - strawberry cupcakes! Most of the cupcake recipes out there are kind of lame, only adding chunks of strawberries to vanilla cake batter. I knew that nothing short of beautiful, uniformly pink cakes would make the cut, so I was overjoyed when I stumbled across this recipe for Sprinkles strawberry cupcakes.

They're a gorgeous light pink color, wonderfully tender and offer the perfect amount of sweetness and strawberry flavor. Topped with a slice of fresh strawberry, they're beautiful little additions to a dessert table. Don't miss your chance to put that fresh farmers market fruit to good use this June!

I experimented with a vanilla mascarpone frosting, but didn't love the result, so I won't post the recipe here. But in the future, I would top these with whipped cream or even a light vanilla cream cheese frosting. The sky's the limit! But don't overwhelm the strawberry flavor with a topping that's more intense than vanilla.


Sprinkles Strawberry Cupcakes
Recipe from Oprah.com
Makes 12 cupcakes


2/3 C fresh strawberries (you can use frozen in a pinch)
1 1/2 C all-purpose flour, sifted
1 tsp baking powder
1/4 tsp salt
1/4 C milk
1 tsp vanilla extract
1/2 C (1 stick) unsalted butter, softened
1 C sugar
1 egg
2 egg whites

Directions: Preheat oven to 350 degrees and prepare cupcake tin with liners. Puree strawberries in a food processor, and set aside 1/3 C to use in the recipe.

In one bowl, whisk together flour, baking powder and salt. In another, whisk together milk, vanilla and strawberry puree. Cream butter with an electric mixer until light and fluffy, then add sugar and beat until well-combined. Slowly add egg and egg whites and mix until blended.

At low speed, slowly mix in half of the flour mixture. Add milk mixture. Slowly add the last half of the flour and beat until just blended, scraping down sides of the bowl as needed. Divide batter among cupcake liners and bake until the tops of the cakes spring back to light touch, about 20-25 minutes. Let cupcakes cool completely before frosting.


Sunday, May 6, 2012

Cupcake mix two ways

In the midst of finals, I wasn't exactly swimming in free time to bake and decorate desserts for my dear boyfriend's birthday party. I knew there had to be some kind of shortcut to delicious cupcakes with that homemade taste, and with some research I discovered quite a few suggestions about how to hack the traditional boxed cake mix and turn it into something wonderful.

I ended up trying the simplest of all the recipes, which is to add buttermilk in place of the water when mixing the matter - and boy did it make a difference! Instead of airy sponges, the cupcakes emerged moist, dense and (almost) as good as from scratch. Of course, I always make my own buttermilk with low fat milk and white vinegar, so I never have to go spend extra money on premade - the ultimate shortcut!

While I've seen margarita and champagne cupcakes, I've yet to come across those inspired by our favorite bourbon cocktail - the Old Fashioned. The recipe for happiness is bourbon, Angostura bitters, simple syrup, maraschino cherry and a twist of orange. Excited yet? I tweaked a yellow cake mix with orange zest and juice, brushed on a bourbon simple syrup and topped with bitters buttercream and a maraschino cherry. Success!

To round out the lineup, I decided to honor Cinco de Mayo with some Mexican chocolate cupcakes. A little bit of spice and warmth from the cinnamon contrasted nicely with the sweetness of dulce de leche caramel. These were definitely a crowd pleaser with their indulgent flavors.

Old Fashioned Cupcake
Makes about 16 cupcakes

Orange Zest Cake
1 box yellow cake mix
buttermilk (or add 1 Tbsp white vinegar for every 1 C milk, let sit for at least 5 min)
finely grated zest of one medium orange
1/4 C freshly squeezed orange juice

Directions: Follow directions on cake mix box, replacing water with the same volume of buttermilk. Beat in orange zest and juice with the rest of the batter.
Fill cupcake liners almost to the top, and bake until the top springs back to the touch. Let cool completely before frosting.

Bourbon Simple Syrup
1/4 C water
1/4 C granulated sugar
4 Tbsp bourbon or other whiskey

Directions: Mix water and sugar in a small saucepan and bring to a boil. Let cool completely and then stir in bourbon. Using a pastry brush, brush a small amount of mixture on top of each cooled cupcake.

Bitters Buttercream
Adapted from Serious Eats
8 dashes Angostura bitters
2 Tbsp Bourbon or other whiskey
1 1/2 sticks unsalted butter
3-4 C powdered sugar, sifted

2-3 Tbsp milk

Directions: In an electric mixer, beat butter until light and fluffy. Gradually add powdered sugar, scraping down the bowl as necessary. Add milk and more powdered sugar until you reach the desired consistency. Add bitters and mix thoroughly.


Mexican Chocolate Cupcake
Makes about 16 cupcakes

Mexican Chocolate Cake
1 box milk chocolate cake mix

buttermilk (or add 1 Tbsp white vinegar for every 1 C milk, let sit for at least 5 min)
1 1/2 tsp cinnamon

Directions: Follow directions on cake mix box, replacing water with the same volume of buttermilk. Add cinnamon with dry ingredients.
Fill cupcake liners almost to the top, and bake until the top springs back to the touch. Let cool completely before frosting.

Dulce de Leche Buttercream
From Bakespace
3/4 can of dulce de leche

1 1/2 sticks unsalted butter
2-3 C powdered sugar, sifted
2-3 Tbsp milk

Directions: In an electric mixer, beat butter until light and fluffy. Gradually add powdered sugar, scraping down the bowl as necessary. Add dulce de leche and beat to combine. Add milk and more powdered sugar until you reach the desired consistency.


Thursday, April 26, 2012

Peanut Butter Cup Brownies

Some people don't like the combination of peanut butter and chocolate, but for the other 99% I've got a pretty awesome new way to eat it.


What appears to be a regular old delicious brownie...


...has a peanut butter cookie dough core! Like a giant, ridiculously good peanut butter cup, this treat has the best of both flavors and a fantastic texture.

Step 1. Whip up a batch of peanut butter cookie dough. I used this recipe and it was (in my opinion) the perfect texture and flavor for regular cookies and to use in this brownie. Refrigerate overnight.


Step 2. Prepare brownie batter (from scratch or Ghirardelli's Double Chocolate mix - it's so easy and makes brownies better than most).
Prepare muffin tin with cupcake liners, and divide brownie batter evenly among the twelve cups. Form 12 small balls of cookie dough and press into the center of each cup. You may have to spoon some batter over the top of the cookie to completely cover them.


Step 3. Bake in a 325 degree oven for about 25-30 minutes, until the top of the brownies are cracked and the batter is set (just like normal brownies).

Step 4. Make 11 new best friends. Of course, one's for you.


Obviously, the leftover dough has to turn into cookies!


Tuesday, April 24, 2012

A Lotta Ricotta

I wanted to start titling my posts like a grown-up, but I couldn't resist this one.

After some lovely experiences with making lemon ricotta pancakes for lazy Saturday breakfasts, I've been on a bit of a kick with this creamy, impossibly fluffy cheese. It's a yummy dessert topped with honey or roasted berries, or it adds fantastic lightness to the texture of cakes and pancakes. Now that spring is springing, you can try my delicious recipe for Lime Ricotta Cupcakes or start your morning with my newest project, Blueberry Ricotta Muffins.


I'm not going to try to justify these muffins with the words hearty or fiber. In my opinion, the only real difference between the most delicious muffins and cupcakes is a bunch of frosting. I can tell you confidently, however, that they are a treat that may just give you the soul food you crave at the beginning or end of a long day. Warm it up, spread a little butter on (I won't tell...) and enjoy with a cup of tea while enjoying the San Francisco fog. The turbinado sugar sprinkled on top adds some sparkle and sweet crunch that puts on the perfect finishing touch. 


Feel free to substitute raspberries, blackberries or even sliced strawberries if that's more your style; I threw in the last of the blueberries that I froze from last August, and they still taste as sweet as the day I bought them. If I haven't mentioned it enough, you should definitely buy a large container of blueberries when they are in season and freeze them - you'll be so glad you did when you're enjoying fresh blueberry pancakes in the middle of December!
Nutmeg from the wild!


A couple of notes about the recipe:
- I found that using half whole wheat pastry flour gave the muffins a little bit more substance.
- If you can, invest in a few whole nutmegs and a microplane. Fresh nutmeg is SO much better, in every recipe, when you've just grated it yourself!
- Depending on the ricotta you buy, it may be a little bit grainier in texture. I popped mine in a Cuisinart and blended it until it was a uniform, creamy texture that mixed into the recipe more consistently.


Blueberry Ricotta Muffins
Adapted from Two Peas & Their Pod
Makes 12 muffins


1 C granulated sugar
1/2 C (1 stick) butter - softened
1 C ricotta cheese
1 egg
1 tsp vanilla extract

2 C all-purpose flour (or I used 1 C all-purpose and 1 C whole wheat pastry flour)
1/2 tsp baking powder
1/2 tsp baking soda
1/2 tsp salt
1/2 tsp freshly ground nutmeg

1 C fresh or frozen berries
Turbinado sugar (for topping)

Directions: Preheat oven to 350 degrees. Line muffin tin with cupcake liners or nonstick spray.

Cream butter and sugar together in an electric mixer on medium-high speed for several minutes until light and fluffy. Add ricotta and mix, scraping down the bowl as needed. Add egg and vanilla and blend together.
Sift together flour, baking powder, baking soda, salt and nutmeg. Blend into the ricotta mixture gradually, being careful not to overmix. Add berries and stir to combine.

Divide batter evenly among cupcake liners. The dough won't rise a lot, so don't be afraid to essentially fill them. Sprinkle the tops of each muffin with turbinado sugar. Bake for about 20 minutes or until the tops are golden brown.


Thursday, April 12, 2012

Back to the classics


Just like it's important to watch the original Star Wars, sometimes it's necessary to go back to the classics and make sure you've got the best recipe possible - one you can always rely on to deliver amazing results with a taste of nostalgia. Clearly, the first stop is chocolate chip cookies.

Say what you will, but a good chocolate chip cookie will always be the ultimate crowd-pleaser, bad day-fixer and good day-improver. Lucky for you, I've gone through a lot of mediocre (and downright bad) cookies on my way to the following recipe, and with my years of trial and error I think I can help you make the best chocolate chippers you've ever pulled out of the oven.


There are a couple of choices that you have to make when working through your ingredient list. Most importantly, chocolate can make or break the finished cookie. I tend to prefer a mix of milk and dark chocolate, which I buy in blocks and chop when needed (or just eat in large chunks). I think it gives more dimension and a sophisticated flavor, but everyone has their own preference - run with it!


Secondly, your choice of flour makes a big difference in flavor and texture. Traditional all-purpose white flour is the usual choice, but I think there's something to be said for tempering sweetness with a bit of the heartier, nuttier flavor of whole wheat. It only took once for me to learn never to bake with "whole wheat flour" - it actually tastes like wheat, and kind of has the texture of sand. Luckily Bob's Red Mill makes a "whole wheat pastry flour" which is much finer ground and lighter texture, and has performed swimmingly in many cookie recipes. It produces noticeably more substantial cookies, but I tend to use it regularly.

Thanks to research and my own experiments, I've determined the following essential steps for the ideal cookie texture and color. Ultimately, you want the dough and baking sheet to be very cold when you put them in the oven, which will prevent over-spreading of the dough and preserve a thick and fluffy cookie.


1. Do not pack the brown sugar while measuring it out - just treat it as normal sugar.
2. Use cold butter. Do not soften the butter before beating with sugar. Electric mixers are more than powerful enough to handle cold butter - apparently that part of most traditional recipes is a relic from pre-power mixer days.
3. Freeze dough in an airtight container for 24 - 48 hours before baking. This prevents excess spreading of the dough when baking. Just make sure you shape the dough into balls before you freeze them!
4. Use a silicone baking sheet or parchment paper. NEVER use a bare cookie sheet.
5. Never use a heated baking sheet for a new batch of cookies. If you're going to reuse the sheet, make sure it's cooled completely before putting dough on it.
6. Remove the cookies from the oven when lightly golden in color, and leave the cookies to cool completely on the baking sheet. Don't move them to a wire rack.


Best Ever Chocolate Chip Cookies
Yields about 30 cookies
Adapted from Betty Crocker

1 C brown sugar (not packed)
1/2 C granulated sugar
1 C (2 sticks) butter
1 tsp vanilla extract
1 egg
2 1/4 C all-purpose flour (or whole wheat pastry flour)
1 tsp baking soda
1/2 tsp salt
2 C chocolate chips or chopped chocolate

 
Directions: Beat butter and sugars in the bowl of an electric mixer for several minutes, until light and fluffy. Scrape down bowl to make sure everything is incorporated. Add vanilla and egg and beat to combine. Gradually add flour, baking soda and salt. Add chocolate when there is still a little bit of flour left to incorporate, so everything comes together at the same time. Scrape down bowl as necessary to prevent pockets of dry ingredients. Don't overmix, as it activates the gluten and can make the dough tough.


Form dough into balls about one inch in diameter, then freeze for at least 24 hours in an airtight bag or plastic container.

Preheat oven to 375 degrees. When oven is up to temperature, place a dozen frozen dough balls onto parchment or silicone sheet and place in oven. Bake for about 10-12 minutes, until top of cookies are a light golden brown. Remove from oven and let cookies cool on the baking sheet (if you can!)


Try and resist...


Monday, April 9, 2012

It's been a while...

Wow. To say that a lot has happened since my last post would be a bit of an understatement, and to be honest I wasn't sure I'd ever post on this blog again. Between 8 hours of class every day and working on the weekends, I haven't exactly had a lot of time for extracurriculars. No one ever told me grad school was this hard...?
I've been uninspired and not feeling particularly enthused with my baking. Let me tell you, I've made a lot of chocolate chip cookies in the last six months - but that would make for some dull reading, don't you think? It's also easy to think that no one actually reads any of this, and I was writing for an audience of one.

But then - people started coming out of the woodwork to ask where I'd gone! Honestly, I'm very pleasantly surprised and flattered, and it got me thinking about giving this little project another shot. I think that with summer clinicals in sight (meaning a semi-vacation), I've let myself consider new, exciting and most importantly, delicious projects.

The best I can say right now is to stay tuned. Something new is coming soon, but I want to make sure it's quality stuff worthy of my lovely readers. Thank you all for making me feel so loved :)


Here's a little something to hold you over. You may remember that during my last year in San Diego, I worked at a little place called Extraordinary Desserts. The short version? They make ridiculously good (and complex) cakes. I was overjoyed when the owner Karen Krasne released a cookbook - Extraordinary Cakes - in October, but haven't had the chance to attempt any of these whopping creations until now.

Spring break seemed to mix well with tequila and lime, and the result was the Vallarta. Lime sponge cake brushed with a tequila simple syrup, then layered with lime pastry cream, lime curd and lime whipped cream. Yup.

This exquisite combinations of textures and flavors was perfect for a Mexican dinner party and margaritas with friends, but it was certainly a project that I wouldn't recommend to the faint of heart or those without hours to spend on several days prepping the different components.

For the recipe (all 6 pages of it), you have to get the book! Regardless, the gorgeous pictures of dozens of cakes are worth the price of the book alone.