Sunday, December 19, 2010

Tidings of comfort and joy


I was on my break during work last night and enjoying a steaming cup of one of our amazing teas when a coworker walked by and said that with that look of pure bliss I should be in a coffee commercial. I don't know about that, but I do suspect that I look very content as I find myself completely absorbed in the experience of drinking a cup of soul-restoring coffee, tea, hot chocolate - whatever. If you're like me, there's only one way to make that cup of coffee even better. Baked goods.

Coffee cake is a classic choice, and I realized that I've sadly ignored this genre of baking for a while. When I stumbled upon this recipe for blueberry coffee cake made with sour cream instead of milk, I knew it had to be next on my baking list. In general, sour cream, buttermilk and milk can be interchanged in recipes, with higher fat content making a richer cake. I say that if you're going to eat cake, eat GOOD cake - none of this non-fat milk nonsense.

Also, I followed a tip on the original website to make the streusel topping "upside down" if using a bundt pan. Instead of being on the top like usual if you're baking it in a square pan, sprinkle it on top of filled bundt molds - it will be on the bottom when you flip it! My streusel wasn't too thick, but you can make it as sugary as you'd like!

Note: This recipe could be fun with any kind of berries, especially chopped strawberries, raspberries, cranberries... the list goes on.


Blueberry Sour Cream Coffee Cake
From Savory Sweet Life


Streusel:
5 Tbsp butter, cold and cut into 1/2" chunks
3/4 C all-purpose flour
1 C brown sugar
2 tsp cinnamon
1/4 tsp salt

Directions: Mix all ingredients together using a food processor or pastry cutter until butter is still crumbly.

Coffee Cake:

1 C sugar
1 1/2 sticks butter, softened

2 C all-purpose flour
2 tsp baking powder
1/2 tsp salt
1 egg
2 tsp vanilla extract
1/2 C sour cream
2 C blueberries (fresh or frozen)

Directions: Preheat oven to 350 degrees. Prepare non-silicone pans with nonstick spray or butter and flour. Cream butter and sugar until light and creamy, about 3-4 minutes. Add egg, sour cream and vanilla and blend for another 2 minutes. Add salt, baking powder and flour and mix until fully incorporated. Gently fold in blueberries and spoon into molds or pan. Spoon on streusel topping and gently press into top of batter. Bake for about 30 minutes if using mini bundt pans, or up to 60 minutes if using an 8"x8" pan. The cake is done when a toothpick comes out clean.


Monday, December 13, 2010

Upside down

Call me a creature of habit, but when I have extra cranberries in my freezer, I instantly think to combine them with gingerbread. Tart and spicy just work so well together, and it really is the best way to sum up the holiday season for me. Last December, I was perusing Christmas markets in Berlin in zero degree weather, and I found an adorable flower-shaped silicone mini bundt pan. Little did I know, my darling friend Julia bought it for me and brought it back to the states to give to me! I have not used this pan as much as I should, and I had to break it out again for this occasion. I adore silicone pans because there is literally no prep and very easy cleanup - they are the ultimate non-stick bakeware! I imagine that this recipe could be used with a full 8" size cake pan, but aren't the mini ones cuter?


As for the gingerbread cake recipe, I was very pleased by its light and tender texture and perfect blend of spice. While the original recipe called for whole milk and buttermilk, I decided to use all buttermilk to increase the tenderness and fluffiness of the cake. Because buttermilk is more acidic than "sweet" milk, you need to add more baking soda (a base) to balance it.

So if you're living somewhere cold, pop one in the microwave for a few seconds and make yourself a cup of tea. If you're wearing shorts in San Diego's 75 degree weather, a cold glass of milk might be more suitable. But wherever you are, this gingerbread bundt will hit the holiday spot :)


Mini Cranberry Gingerbread Bundts
Adapted from These Peas Are Hollow
Makes about 18 mini bundts

5 Tbsp unsalted butter
2/3 C brown sugar, packed
fresh or frozen cranberries


2 1/4 C all purpose flour
3/4 tsp baking soda
1/2 tsp salt
1/2 tsp allspice
1/2 tsp ground cloves
1/2 tsp ground nutmeg
1 tsp cocoa powder
1 tsp ground cinnamon
2 tsp ground ginger
1 stick (8 Tbsp) unsalted butter, melted then brought to room temperature
3/4 C dark molasses
3/4 C sugar
1 egg
1 C buttermilk


Directions: Preheat oven to 350 degrees. Prepare a bundt pan with nonstick spray or butter and flour (if you are using a silicone mold, then no prep is needed). 


For the cranberry topping, melt butter and brown sugar in a saucepan over medium-low heat, stirring frequently. Cook until sugar is dissolved and the mixture begins to caramelize. Spoon a small amount of the caramel into the bottoms of the bundt molds, so that it thinly covers the entire base. Sprinkle on cranberries and set aside the molds.


Whisk together all dry ingredients and set aside. In a large mixing bowl, beat together molasses and sugar, then add butter and egg, mixing completely between each addition. Slowly add in buttermilk and mix until incorporated. In a few additions, mix in dry ingredients until just combined. Fill bundt molds 3/4 full and smooth the top. Bake for 25-30 minutes until the top of the cake springs back to the touch and a toothpick inserted in the center comes out clean. Let cool for 20 minutes, then turn molds upside down on a wire rack and let the bundts cool completely.

Friday, December 10, 2010

Feliz Navidad!

I can't pretend to take credit for this magical combination of flavors, but I am very excited to have found a combination of textures that showcases them in an unbelievably delicious fashion! While I'm still not up to the level of liking "spicy" chocolate, I've grown very fond of Mexican chocolate spiced with cinnamon and various types of pepper. I wanted to try to incorporate Mexican chocolate into this homemade "oreo" recipe I found, and while the cookies are not spicy by any means, the cinnamon and pepper adds a nice subtlety of spice to the cocoa powder. As for the filling, I wanted to experiment with dulce de leche, a wonderful product I hadn't learned about and fallen in love with until the last few years. Its sweet caramel taste and smooth, gooey texture are the perfect complement to the crisp, buttery cookies that sandwich it in this recipe. Be warned - you may not be able to stop at one... or four...


Mexican Chocolate Oreos
1. Bake chocolate cookies, let cool completely.
2. Make dulce de leche using microwave method (below) or another if you prefer.
3. Pipe dulce de leche onto half of the chocolate cookies and sandwich with the other half.


Mexican Chocolate Cookies
Adapted from Thomas Keller's Oreos


3/4 cup sugar
1 1/2 cups all-purpose flour plus 3 tablespoons 
3/4 cup unsweetened cocoa plus 1 tablespoon
1/2 teaspoon baking soda
1 1/2 teaspoons salt

3/4 tsp cinnamon
1 tsp vanilla extract
generous pinch of black pepper
generous pinch of cayenne pepper (if you want extra spice)
15 tablespoons (7 1/2 oz) unsalted butter, cut into 3/4-inch cubes, at room temperature


cinnamon and raw sugar for dusting (optional)


Directions: Preheat oven to 350 F and line baking sheets with parchment. In the bowl of a stand mixer fitted with the paddle attachment, mix the sugar, flour, cocoa powder, baking soda, cinnamon, black pepper and salt on low speed until combined.  With the mixer still on low speed, add the butter a few pieces at a time until it is all in the bowl.  The dough will look sandy for a long time, but just let it keep mixing for a few minutes.  When the dough does start to come together, stop the mixer.

Transfer the dough to a work surface and divide into two pieces. Working with one half at a time, roll the dough on a lightly floured work surface or parchment until it is 1/8-inch thick.  Cut rounds from the dough and place them 1/2 to 1 inch apart on the prepared baking sheets. Sprinkle with cinnamon and raw sugar if desired. Continue re-rolling and cutting until all the dough has been used.

Bake for 12-15 minutes, rotating the baking sheets halfway through. Let cookies cool on the baking sheet for 4-5 minutes, then transfer to a wire rack to cool completely. 


Dulce de Leche Filling

Dulce de leche (known as confiture du lait in France) is a lovely caramel-like sauce or flavoring that is used in many Latin American dessert products. Depending on the texture, you can drizzle it on ice cream, use it to fill tarts or make sandwich cookies! Delish. It is traditionally made by simmering a can of sweetened condensed milk in a pot of water for several hours, but I came across a microwave method that seemed a little more practical. I had to microwave the dulce de leche for a minute after the recommended 

Microwave method from The Perfect Pantry

1 14-oz can of sweetened condensed milk (like La Lechera)

Directions: Empty sweetened condensed milk into a large glass bowl and cover with plastic wrap. Leave a small part uncovered to allow steam to escape. Microwave at medium heat (level 5 if you have 10 power levels) for 2 intervals of 2 minutes each. In between each heating, uncover and stir with a wire whisk. Then heat for 10 minutes in 2 1/2 minute intervals, whisking in between. With each heating, the milk will get thicker and become more caramel colored. After the 10 minutes, you may need to microwave for a longer time to get the desired thickness. Heat for 2-3 more minutes in 1 minute intervals until it's very thick (I heated it for 1 more minute). Let cool completely before using.

SAFETY NOTE! The bowl and milk will get very hot by the time you're about 6 minutes in, so please please use oven mitts or a towel to grab the bowl out of the microwave and use caution when uncovering and whisking. Also, the reason you need to use a large bowl is that if the milk touches the plastic wrap, it will melt it - and no one wants chunks of plastic in their dulce de leche. End of story, be careful - I don't want anyone to be burned in the pursuit of dessert! 

Put on your yarmulke...

... it's past the last day of Hannukah! I am super late on this, but I don't want to completely leave out Hannukah in the celebration of yummy baked things. I've become an honorary Jew this year thanks to my roomies, and I'm embracing the experience of lighting the candles each night over some matzo ball soup.

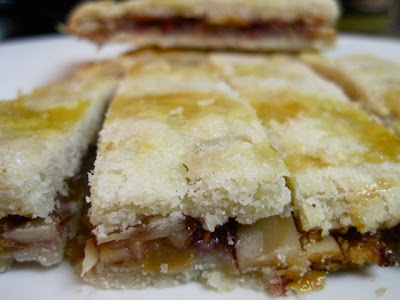
I first fell in love with ruglach when I found them in my mom's international cookie cookbook as an 8 year-old, and when I saw this new interpretation of the traditional Jewish cookie I knew I had to try it! I love the traditional filling of cinnamon and nuts, but I wanted to try something different so I mixed up a combination of raspberry, raisins and sliced almonds.

The verdict? My coworkers and roommates thought they were delightful, and I loved that they're a flaky, light but filling departure from many other holiday cookies. Feel free to experiment with different fillings - I've seen Nutella and hazelnut, walnut and cinnamon and many others!

Raspberry Raisin Almond Ruglach Bars 
Adapted from Hungry Rabbit

1 1/2 sticks unsalted butter, cold and cut into 1/2" pieces
8 oz cream cheese
2 C all-purpose flour
1/2 tsp salt

1 C raspberry jam
1/2 C golden raisins
1 C sliced almonds

1 egg yolk
3 Tbsp granulated sugar

Directions: Mix butter and cream cheese with a paddle attachment on low speed until cream cheese is broken down but butter is still slightly chunky. Add flour and salt at low speed and mix for about 20 seconds - until the dough begins to hold together but is still crumbly. Divide the dough into two and press together two rectangles on plastic wrap. Wrap tightly and refrigerate for at least 5 hours.

Preheat oven to 350 degrees. Toast sliced almonds on a foil-lined baking sheet until golden brown and fragrant. Remove and let cool. Line a baking sheet with parchment. Roll out one dough rectangle to a 9" x 13" rectangle and lay on the baking sheet. Spread raspberry jam over dough, then sprinkle raisins and almonds evenly over. Roll out second sheet of dough, lay over filling, and trim edges to match. Brush egg yolk over top layer and sprinkle with sugar. Bake until golden, about 30-35 minutes, rotating halfway. Cool on a wire rack and cut into 24 bars about 1" x 3 3/4" in dimension.


Wednesday, December 8, 2010

A very merry gluten-free holiday

The plight of my gluten-free friends is never far from my mind. I myself try to eat gluten-free except for my baked goods, because although I'm not allergic, I find that less gluten makes me feel so much better!

Fun fact: Gluten is a protein found in rye, wheat and barley, and is responsible for the toughness you get in baked goods when you over-knead or mix dough. It is not found in rice, corn, quinoa, oats, or soybeans.

So in the gluten-free spirit, I decided to give this recipe a shot. I've become enamored with the flavor of pistachio since my time in Paris - they use it a lot there, while it's relatively rare to find here in the states. Because this recipe uses both almond meal and pistachios, it's a little pricey, but once I tasted the finished product I decided it was well worth the cost!

The only trick to this recipe (which is super easy) is to grind the pistachios. I don't have a food processor at school (Christmas...?) but I do have a coffee grinder which worked splendidly. Chopping by hand really won't work because the consistency of the cookie is much better when you have a flour-like consistency for the almond and pistachio.

So rejoice gluten-free and gluten-loving friends - this is the easiest and most lovely recipe you'll find this holiday season! Enjoy!

Italian Pistachio Cookies
Adapted from Trissalicious
Makes about 12 cookies


1 C dry roasted unsalted pistachio nutmeats, ground finely
1 C dry roasted unsalted pistachio nutmeats, chopped coarsely
1 C almond meal
1/2 C granulated sugar
2 egg whites

Directions: Preheat oven to 350 degrees and line a baking sheet with parchment. Mix all ingredients together except for the coarsely chopped pistachios. Roll rounded tablespoonfuls in the chopped pistachios, then place on baking sheet. Bake for about 13 minutes.


Tuesday, December 7, 2010

Whoopie!

I'll admit that I'm pretty late to jump on the whoopie pie bandwagon, and I'm also embarrassed to say that  I had never actually tried one before tonight. With that said, it's better late than never - because they are FANTASTIC!

My roommate Helene (yes, you got a shout out) donated a tin of Sprinkles red velvet cupcake mix for the week's baking endeavors, and I decided to use them for my whoopie pies. An easy easy trick for making the cake part of the pies is to use a regular cake mix and add another 1/2 C of flour to the dry ingredients. You need to make the cake denser so it doesn't spread out too much and make flat pies! It's super simple, and the result with the Sprinkles mix was absolutely delicious.

As for the filling, the classic pairing with red velvet is cream cheese frosting. However, dearest Helene can't eat cheese, so I tried a new recipe for white chocolate buttercream. AMAZING. Bear in mind the classic points in making buttercream - make sure the bowl is completely dry, the butter is room temperature, and even if the mixture looks a little curdled, keep whipping until it comes together. No sweat!

Red Velvet Whoopie Pies 

Directions: Mix boxed cake mix as usual, but add 1/2 C flour to the dry ingredients. Drop rounded spoonfuls of dough on a parchment-lined baking sheet and make sure they're relatively smooth and round. Bake for 6-8 minutes, until the center of the cake springs back when touched. Cool completely before filling.

White Chocolate Buttercream
From Ptit Chef
Makes enough frosting for a batch of whoopie pies from one cake mix

1/2 C sugar
3 egg whites
9 Tbsp unsalted butter, softened
1/8 C white chocolate, melted and cooled to room temperature

Directions: Combine sugar and egg whites over a double boiler over medium-high heat. Whisk very frequently until the sugar is totally dissolved into the egg whites. You should be able to rub your fingers together in the egg without feeling grains of sugar. Pour into a dry mixing bowl and whisk on high speed until the egg is room temperature and soft peaks are beginning to form. Add butter in small chunks, incorporating completely between each addition. Keep whisking at high speed until frosting consistency forms. Add chocolate and incorporate completely. If any textural issues occur, just keep whisking until it resolves!

Pipe frosting onto flat side of one cake piece, then sandwich with another matching sized piece. Press slightly so the frosting reaches the edge. Take a bite, and experience pure bliss.


Wednesday, December 1, 2010

It's beginning to taste a lot like Christmas

There is nothing that makes me happier than baking during the holiday season. Now that Thanksgiving has passed, I'm officially in baking overdrive (and by default eating overdrive). To me, Christmas can be defined by two things - cranberries and gingerbread. I never see these ingredients used outside of winter baking, so obviously I look to them first when I start the marathon of December baking. I found this recipe and instantly knew I was going to bake - and love - it. The end product blew me away with its combination of sweet, spicy and tart, and it is like a little bit of Christmas in every bite.
I substituted fresh frozen cranberries for dried, and loved the result. As for the rest, I stuck to the recipe   - honestly, I wouldn't change a thing! I can't say enough good things about this recipe, and it's definitely going in my repertoire for future baking :)


Gingerbread Scones with Maple Glaze
Adapted from The Noshery
Makes 8 scones


1 3/4 C whole wheat pastry flour
3/4 C old fashioned rolled oats
1/3 C packed light brown sugar
2 tsp ground ginger
1 1/2 tsp cinnamon
1/8 tsp ground cloves
1/4 tsp salt
2 tsp baking powder
1/2 tsp baking soda
1/2 C cold unsalted butter, cut into pieces
Zest of 1 lemon
1/3 C dried cranberries
1/2 C buttermilk
2 1/2 Tbsp unsulphured molasses
1 tsp vanilla extract


Glaze:
1/2 C sifted confectioners sugar
1 1/2 Tbsp pure maple syrup
1/2 tsp unsulphured molassas
1 – 2 tsp milk


Directions: In the bowl of a stand mixer, whisk together, flour, oats, sugar, ginger, cinnamon, cloves, salt, baking powder and baking soda. Using a fork or a pastry cutter, cut the butter into the flour until it looks crumbly. Stir in cranberries and lemon zest. In a separate bowl combine buttermilk, molasses and vanilla. With the dough hook attachment, slowly mix the flour/butter mixture and gradually add buttermilk mixture. Mix until just combined and begins to form a ball. 

Transfer dough to a lightly floured surface. Knead dough gently about four or five times and form into a large ball. Push the dough down and form into a large circle about 7 inches wide and 1 1/2 inches thick. Cut the circle in half and cut each half into 4 even slices. Place scones on baking sheet.
Place baking sheet into another baking sheet to keep the scones bottoms from over browning.  Bake for 20 minutes until golden brown and a toothpick inserted comes out clean.  Transfer to cooking rack when done.
For the glaze, combine all ingredients. Add more milk as necessary (start with 1 tsp) to get your desired consistency. Drizzle over cooled scones and let dry.