Sunday, December 19, 2010

Tidings of comfort and joy


I was on my break during work last night and enjoying a steaming cup of one of our amazing teas when a coworker walked by and said that with that look of pure bliss I should be in a coffee commercial. I don't know about that, but I do suspect that I look very content as I find myself completely absorbed in the experience of drinking a cup of soul-restoring coffee, tea, hot chocolate - whatever. If you're like me, there's only one way to make that cup of coffee even better. Baked goods.

Coffee cake is a classic choice, and I realized that I've sadly ignored this genre of baking for a while. When I stumbled upon this recipe for blueberry coffee cake made with sour cream instead of milk, I knew it had to be next on my baking list. In general, sour cream, buttermilk and milk can be interchanged in recipes, with higher fat content making a richer cake. I say that if you're going to eat cake, eat GOOD cake - none of this non-fat milk nonsense.

Also, I followed a tip on the original website to make the streusel topping "upside down" if using a bundt pan. Instead of being on the top like usual if you're baking it in a square pan, sprinkle it on top of filled bundt molds - it will be on the bottom when you flip it! My streusel wasn't too thick, but you can make it as sugary as you'd like!

Note: This recipe could be fun with any kind of berries, especially chopped strawberries, raspberries, cranberries... the list goes on.


Blueberry Sour Cream Coffee Cake
From Savory Sweet Life


Streusel:
5 Tbsp butter, cold and cut into 1/2" chunks
3/4 C all-purpose flour
1 C brown sugar
2 tsp cinnamon
1/4 tsp salt

Directions: Mix all ingredients together using a food processor or pastry cutter until butter is still crumbly.

Coffee Cake:

1 C sugar
1 1/2 sticks butter, softened

2 C all-purpose flour
2 tsp baking powder
1/2 tsp salt
1 egg
2 tsp vanilla extract
1/2 C sour cream
2 C blueberries (fresh or frozen)

Directions: Preheat oven to 350 degrees. Prepare non-silicone pans with nonstick spray or butter and flour. Cream butter and sugar until light and creamy, about 3-4 minutes. Add egg, sour cream and vanilla and blend for another 2 minutes. Add salt, baking powder and flour and mix until fully incorporated. Gently fold in blueberries and spoon into molds or pan. Spoon on streusel topping and gently press into top of batter. Bake for about 30 minutes if using mini bundt pans, or up to 60 minutes if using an 8"x8" pan. The cake is done when a toothpick comes out clean.


Monday, December 13, 2010

Upside down

Call me a creature of habit, but when I have extra cranberries in my freezer, I instantly think to combine them with gingerbread. Tart and spicy just work so well together, and it really is the best way to sum up the holiday season for me. Last December, I was perusing Christmas markets in Berlin in zero degree weather, and I found an adorable flower-shaped silicone mini bundt pan. Little did I know, my darling friend Julia bought it for me and brought it back to the states to give to me! I have not used this pan as much as I should, and I had to break it out again for this occasion. I adore silicone pans because there is literally no prep and very easy cleanup - they are the ultimate non-stick bakeware! I imagine that this recipe could be used with a full 8" size cake pan, but aren't the mini ones cuter?


As for the gingerbread cake recipe, I was very pleased by its light and tender texture and perfect blend of spice. While the original recipe called for whole milk and buttermilk, I decided to use all buttermilk to increase the tenderness and fluffiness of the cake. Because buttermilk is more acidic than "sweet" milk, you need to add more baking soda (a base) to balance it.

So if you're living somewhere cold, pop one in the microwave for a few seconds and make yourself a cup of tea. If you're wearing shorts in San Diego's 75 degree weather, a cold glass of milk might be more suitable. But wherever you are, this gingerbread bundt will hit the holiday spot :)


Mini Cranberry Gingerbread Bundts
Adapted from These Peas Are Hollow
Makes about 18 mini bundts

5 Tbsp unsalted butter
2/3 C brown sugar, packed
fresh or frozen cranberries


2 1/4 C all purpose flour
3/4 tsp baking soda
1/2 tsp salt
1/2 tsp allspice
1/2 tsp ground cloves
1/2 tsp ground nutmeg
1 tsp cocoa powder
1 tsp ground cinnamon
2 tsp ground ginger
1 stick (8 Tbsp) unsalted butter, melted then brought to room temperature
3/4 C dark molasses
3/4 C sugar
1 egg
1 C buttermilk


Directions: Preheat oven to 350 degrees. Prepare a bundt pan with nonstick spray or butter and flour (if you are using a silicone mold, then no prep is needed). 


For the cranberry topping, melt butter and brown sugar in a saucepan over medium-low heat, stirring frequently. Cook until sugar is dissolved and the mixture begins to caramelize. Spoon a small amount of the caramel into the bottoms of the bundt molds, so that it thinly covers the entire base. Sprinkle on cranberries and set aside the molds.


Whisk together all dry ingredients and set aside. In a large mixing bowl, beat together molasses and sugar, then add butter and egg, mixing completely between each addition. Slowly add in buttermilk and mix until incorporated. In a few additions, mix in dry ingredients until just combined. Fill bundt molds 3/4 full and smooth the top. Bake for 25-30 minutes until the top of the cake springs back to the touch and a toothpick inserted in the center comes out clean. Let cool for 20 minutes, then turn molds upside down on a wire rack and let the bundts cool completely.

Friday, December 10, 2010

Feliz Navidad!

I can't pretend to take credit for this magical combination of flavors, but I am very excited to have found a combination of textures that showcases them in an unbelievably delicious fashion! While I'm still not up to the level of liking "spicy" chocolate, I've grown very fond of Mexican chocolate spiced with cinnamon and various types of pepper. I wanted to try to incorporate Mexican chocolate into this homemade "oreo" recipe I found, and while the cookies are not spicy by any means, the cinnamon and pepper adds a nice subtlety of spice to the cocoa powder. As for the filling, I wanted to experiment with dulce de leche, a wonderful product I hadn't learned about and fallen in love with until the last few years. Its sweet caramel taste and smooth, gooey texture are the perfect complement to the crisp, buttery cookies that sandwich it in this recipe. Be warned - you may not be able to stop at one... or four...


Mexican Chocolate Oreos
1. Bake chocolate cookies, let cool completely.
2. Make dulce de leche using microwave method (below) or another if you prefer.
3. Pipe dulce de leche onto half of the chocolate cookies and sandwich with the other half.


Mexican Chocolate Cookies
Adapted from Thomas Keller's Oreos


3/4 cup sugar
1 1/2 cups all-purpose flour plus 3 tablespoons 
3/4 cup unsweetened cocoa plus 1 tablespoon
1/2 teaspoon baking soda
1 1/2 teaspoons salt

3/4 tsp cinnamon
1 tsp vanilla extract
generous pinch of black pepper
generous pinch of cayenne pepper (if you want extra spice)
15 tablespoons (7 1/2 oz) unsalted butter, cut into 3/4-inch cubes, at room temperature


cinnamon and raw sugar for dusting (optional)


Directions: Preheat oven to 350 F and line baking sheets with parchment. In the bowl of a stand mixer fitted with the paddle attachment, mix the sugar, flour, cocoa powder, baking soda, cinnamon, black pepper and salt on low speed until combined.  With the mixer still on low speed, add the butter a few pieces at a time until it is all in the bowl.  The dough will look sandy for a long time, but just let it keep mixing for a few minutes.  When the dough does start to come together, stop the mixer.

Transfer the dough to a work surface and divide into two pieces. Working with one half at a time, roll the dough on a lightly floured work surface or parchment until it is 1/8-inch thick.  Cut rounds from the dough and place them 1/2 to 1 inch apart on the prepared baking sheets. Sprinkle with cinnamon and raw sugar if desired. Continue re-rolling and cutting until all the dough has been used.

Bake for 12-15 minutes, rotating the baking sheets halfway through. Let cookies cool on the baking sheet for 4-5 minutes, then transfer to a wire rack to cool completely. 


Dulce de Leche Filling

Dulce de leche (known as confiture du lait in France) is a lovely caramel-like sauce or flavoring that is used in many Latin American dessert products. Depending on the texture, you can drizzle it on ice cream, use it to fill tarts or make sandwich cookies! Delish. It is traditionally made by simmering a can of sweetened condensed milk in a pot of water for several hours, but I came across a microwave method that seemed a little more practical. I had to microwave the dulce de leche for a minute after the recommended 

Microwave method from The Perfect Pantry

1 14-oz can of sweetened condensed milk (like La Lechera)

Directions: Empty sweetened condensed milk into a large glass bowl and cover with plastic wrap. Leave a small part uncovered to allow steam to escape. Microwave at medium heat (level 5 if you have 10 power levels) for 2 intervals of 2 minutes each. In between each heating, uncover and stir with a wire whisk. Then heat for 10 minutes in 2 1/2 minute intervals, whisking in between. With each heating, the milk will get thicker and become more caramel colored. After the 10 minutes, you may need to microwave for a longer time to get the desired thickness. Heat for 2-3 more minutes in 1 minute intervals until it's very thick (I heated it for 1 more minute). Let cool completely before using.

SAFETY NOTE! The bowl and milk will get very hot by the time you're about 6 minutes in, so please please use oven mitts or a towel to grab the bowl out of the microwave and use caution when uncovering and whisking. Also, the reason you need to use a large bowl is that if the milk touches the plastic wrap, it will melt it - and no one wants chunks of plastic in their dulce de leche. End of story, be careful - I don't want anyone to be burned in the pursuit of dessert! 

Put on your yarmulke...

... it's past the last day of Hannukah! I am super late on this, but I don't want to completely leave out Hannukah in the celebration of yummy baked things. I've become an honorary Jew this year thanks to my roomies, and I'm embracing the experience of lighting the candles each night over some matzo ball soup.

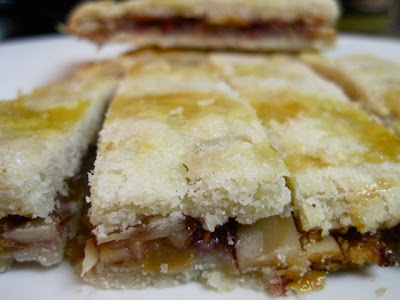
I first fell in love with ruglach when I found them in my mom's international cookie cookbook as an 8 year-old, and when I saw this new interpretation of the traditional Jewish cookie I knew I had to try it! I love the traditional filling of cinnamon and nuts, but I wanted to try something different so I mixed up a combination of raspberry, raisins and sliced almonds.

The verdict? My coworkers and roommates thought they were delightful, and I loved that they're a flaky, light but filling departure from many other holiday cookies. Feel free to experiment with different fillings - I've seen Nutella and hazelnut, walnut and cinnamon and many others!

Raspberry Raisin Almond Ruglach Bars 
Adapted from Hungry Rabbit

1 1/2 sticks unsalted butter, cold and cut into 1/2" pieces
8 oz cream cheese
2 C all-purpose flour
1/2 tsp salt

1 C raspberry jam
1/2 C golden raisins
1 C sliced almonds

1 egg yolk
3 Tbsp granulated sugar

Directions: Mix butter and cream cheese with a paddle attachment on low speed until cream cheese is broken down but butter is still slightly chunky. Add flour and salt at low speed and mix for about 20 seconds - until the dough begins to hold together but is still crumbly. Divide the dough into two and press together two rectangles on plastic wrap. Wrap tightly and refrigerate for at least 5 hours.

Preheat oven to 350 degrees. Toast sliced almonds on a foil-lined baking sheet until golden brown and fragrant. Remove and let cool. Line a baking sheet with parchment. Roll out one dough rectangle to a 9" x 13" rectangle and lay on the baking sheet. Spread raspberry jam over dough, then sprinkle raisins and almonds evenly over. Roll out second sheet of dough, lay over filling, and trim edges to match. Brush egg yolk over top layer and sprinkle with sugar. Bake until golden, about 30-35 minutes, rotating halfway. Cool on a wire rack and cut into 24 bars about 1" x 3 3/4" in dimension.


Wednesday, December 8, 2010

A very merry gluten-free holiday

The plight of my gluten-free friends is never far from my mind. I myself try to eat gluten-free except for my baked goods, because although I'm not allergic, I find that less gluten makes me feel so much better!

Fun fact: Gluten is a protein found in rye, wheat and barley, and is responsible for the toughness you get in baked goods when you over-knead or mix dough. It is not found in rice, corn, quinoa, oats, or soybeans.

So in the gluten-free spirit, I decided to give this recipe a shot. I've become enamored with the flavor of pistachio since my time in Paris - they use it a lot there, while it's relatively rare to find here in the states. Because this recipe uses both almond meal and pistachios, it's a little pricey, but once I tasted the finished product I decided it was well worth the cost!

The only trick to this recipe (which is super easy) is to grind the pistachios. I don't have a food processor at school (Christmas...?) but I do have a coffee grinder which worked splendidly. Chopping by hand really won't work because the consistency of the cookie is much better when you have a flour-like consistency for the almond and pistachio.

So rejoice gluten-free and gluten-loving friends - this is the easiest and most lovely recipe you'll find this holiday season! Enjoy!

Italian Pistachio Cookies
Adapted from Trissalicious
Makes about 12 cookies


1 C dry roasted unsalted pistachio nutmeats, ground finely
1 C dry roasted unsalted pistachio nutmeats, chopped coarsely
1 C almond meal
1/2 C granulated sugar
2 egg whites

Directions: Preheat oven to 350 degrees and line a baking sheet with parchment. Mix all ingredients together except for the coarsely chopped pistachios. Roll rounded tablespoonfuls in the chopped pistachios, then place on baking sheet. Bake for about 13 minutes.


Tuesday, December 7, 2010

Whoopie!

I'll admit that I'm pretty late to jump on the whoopie pie bandwagon, and I'm also embarrassed to say that  I had never actually tried one before tonight. With that said, it's better late than never - because they are FANTASTIC!

My roommate Helene (yes, you got a shout out) donated a tin of Sprinkles red velvet cupcake mix for the week's baking endeavors, and I decided to use them for my whoopie pies. An easy easy trick for making the cake part of the pies is to use a regular cake mix and add another 1/2 C of flour to the dry ingredients. You need to make the cake denser so it doesn't spread out too much and make flat pies! It's super simple, and the result with the Sprinkles mix was absolutely delicious.

As for the filling, the classic pairing with red velvet is cream cheese frosting. However, dearest Helene can't eat cheese, so I tried a new recipe for white chocolate buttercream. AMAZING. Bear in mind the classic points in making buttercream - make sure the bowl is completely dry, the butter is room temperature, and even if the mixture looks a little curdled, keep whipping until it comes together. No sweat!

Red Velvet Whoopie Pies 

Directions: Mix boxed cake mix as usual, but add 1/2 C flour to the dry ingredients. Drop rounded spoonfuls of dough on a parchment-lined baking sheet and make sure they're relatively smooth and round. Bake for 6-8 minutes, until the center of the cake springs back when touched. Cool completely before filling.

White Chocolate Buttercream
From Ptit Chef
Makes enough frosting for a batch of whoopie pies from one cake mix

1/2 C sugar
3 egg whites
9 Tbsp unsalted butter, softened
1/8 C white chocolate, melted and cooled to room temperature

Directions: Combine sugar and egg whites over a double boiler over medium-high heat. Whisk very frequently until the sugar is totally dissolved into the egg whites. You should be able to rub your fingers together in the egg without feeling grains of sugar. Pour into a dry mixing bowl and whisk on high speed until the egg is room temperature and soft peaks are beginning to form. Add butter in small chunks, incorporating completely between each addition. Keep whisking at high speed until frosting consistency forms. Add chocolate and incorporate completely. If any textural issues occur, just keep whisking until it resolves!

Pipe frosting onto flat side of one cake piece, then sandwich with another matching sized piece. Press slightly so the frosting reaches the edge. Take a bite, and experience pure bliss.


Wednesday, December 1, 2010

It's beginning to taste a lot like Christmas

There is nothing that makes me happier than baking during the holiday season. Now that Thanksgiving has passed, I'm officially in baking overdrive (and by default eating overdrive). To me, Christmas can be defined by two things - cranberries and gingerbread. I never see these ingredients used outside of winter baking, so obviously I look to them first when I start the marathon of December baking. I found this recipe and instantly knew I was going to bake - and love - it. The end product blew me away with its combination of sweet, spicy and tart, and it is like a little bit of Christmas in every bite.
I substituted fresh frozen cranberries for dried, and loved the result. As for the rest, I stuck to the recipe   - honestly, I wouldn't change a thing! I can't say enough good things about this recipe, and it's definitely going in my repertoire for future baking :)


Gingerbread Scones with Maple Glaze
Adapted from The Noshery
Makes 8 scones


1 3/4 C whole wheat pastry flour
3/4 C old fashioned rolled oats
1/3 C packed light brown sugar
2 tsp ground ginger
1 1/2 tsp cinnamon
1/8 tsp ground cloves
1/4 tsp salt
2 tsp baking powder
1/2 tsp baking soda
1/2 C cold unsalted butter, cut into pieces
Zest of 1 lemon
1/3 C dried cranberries
1/2 C buttermilk
2 1/2 Tbsp unsulphured molasses
1 tsp vanilla extract


Glaze:
1/2 C sifted confectioners sugar
1 1/2 Tbsp pure maple syrup
1/2 tsp unsulphured molassas
1 – 2 tsp milk


Directions: In the bowl of a stand mixer, whisk together, flour, oats, sugar, ginger, cinnamon, cloves, salt, baking powder and baking soda. Using a fork or a pastry cutter, cut the butter into the flour until it looks crumbly. Stir in cranberries and lemon zest. In a separate bowl combine buttermilk, molasses and vanilla. With the dough hook attachment, slowly mix the flour/butter mixture and gradually add buttermilk mixture. Mix until just combined and begins to form a ball. 

Transfer dough to a lightly floured surface. Knead dough gently about four or five times and form into a large ball. Push the dough down and form into a large circle about 7 inches wide and 1 1/2 inches thick. Cut the circle in half and cut each half into 4 even slices. Place scones on baking sheet.
Place baking sheet into another baking sheet to keep the scones bottoms from over browning.  Bake for 20 minutes until golden brown and a toothpick inserted comes out clean.  Transfer to cooking rack when done.
For the glaze, combine all ingredients. Add more milk as necessary (start with 1 tsp) to get your desired consistency. Drizzle over cooled scones and let dry. 

Sunday, November 28, 2010

I am thankful for...

... the love of my friends and family, a roof over my head, the amazing experiences of the last 3 years in college... and butter, flour, sugar, eggs, vanilla.... You get the idea. I was very excited to head home for Thanksgiving, and I wanted to make sure my contributions to the holiday feast were extra special. I don't get a chance to make big desserts because I'm only serving a few people, but this was the perfect opportunity to try something fun.


I have been working at Extraordinary Desserts in San Diego for about 3 months now, and I am more in love with it now than I was when I was only a frequent customer ;) Long story short, I have found my nirvana - and now it sends me a paycheck! One of the most delicious things I've ever eaten in my extensive experience is Extraordinary's Chocolate Croissant Bread Pudding. It's an irresistible combination of crisp, buttery croissant, velvety melted chocolate and smooth custard that blends in every bite. Do I have your attention yet? Because of its popularity, Karen Krasne (the owner of Extraordinary Desserts) published it in an article in the San Diego Reader. I jumped at the chance to replicate it at home for family and friends, and I think I did a pretty good job of recreating the magic. For the ultimate impact, warm up the bread pudding in the oven (or serve straight out of it) and serve with some fresh whipped cream and/or ice cream. 


A few notes: This recipe serves a LOT - feel free to cut down the recipe as long as you use smaller dishes in proportion. In terms of the chocolate, Karen Krasne swears by Valrhona 61 percent. However, Valrhona is probably the most expensive you could buy, so judge by your budget. Trader Joe's has fantastic dark chocolate Pound Plus bars, or you can use Scharffen Berger or Ghirardelli. Just make sure it's around 60% cacao. Also, the recipe calls for 10 croissants, but if you have large croissants don't use all 10. You want to make sure each of the croissant layers is not too thick - the top layer shouldn't be more than a couple of cubes thick (to avoid too much dry croissant on the top).


Chocolate Croissant Bread Pudding
From Extraordinary Desserts (in the San Diego Reader)
4 C heavy cream
  • ¾ C lowfat milk
  • 1 whole vanilla bean or 2 tsp. vanilla extract
  • 12 egg yolks (you can freeze egg whites for use later - like in French macarons!)
  • 1 C granulated sugar

  • 10 medium/large croissants, cut into 2˝ pieces
  • 2 C coarsely chopped bittersweet chocolate 


Directions: To make the crème brûlée custard, heat cream, milk, and vanilla in a medium saucepan to almost — but not quite — a boil. In a separate bowl, whisk egg yolks with granulated sugar until smooth. Carefully stir the hot cream mixture into the egg mixture and then whisk until smooth. Strain the mixture by pouring it through a strainer lined with cheesecloth into a separate bowl. Let cool.


Preheat oven to 275 degrees. Place one and a half cups of the crème brûlée mixture in the bottom of a heavy oval baking dish. Layer the croissant pieces on top of the crème brûlée mixture. Sprinkle the chopped chocolate on top of the croissant pieces. Add another layer of croissant pieces followed by one cup crème brûlée mixture poured on top. Place the remaining croissant pieces on top and cover with the remaining crème brûlée. Bake for 50 minutes. Serve hot or warm.  


And now, on to the PIE! Call me old-fashioned, but I don't think it's Thanksgiving without at least one pie. While I wanted to honor the timeless pumpkin tradition, I found a recipe that seemed to be a great compromise between creativity and the old stand-by. This apple butter pumpkin pie with streusel topping is a fantastic melding of two fall flavors, without tasting too much like one or the other. It's not dramatically different from the traditional recipe but I liked that there was a subtle variation in taste added by the apple butter. Also, the butter makes the filling incredibly creamy (much more than with pumpkin alone) and the center just melts in your mouth. The crisp crust and crunchy streusel topping with pecans makes an excellent contrast to the filling - an essential element to any great pie!


A note about the streusel: I used about 1/3 of the recipe for the topping because I didn't want to have a super thick layer of sugar on top. This part is up to you based on your personal taste!


Apple Butter Pumpkin Pie 
with Pecan Streusel Topping
From Tidy Mom


1 uncooked pie crust (I like the Pillsbury sold rolled up and frozen - you thaw it and press it into your own pie pan)


Filling:
1 C canned pumpkin
1 C apple butter
1/4 C packed dark brown sugar
1/2 tsp cinnamon
1/4 tsp ginger
1/4 tsp nutmeg
1/4 tsp salt
3 eggs, beaten
1 C evaporated milk


Topping:
3 Tbsp butter
1/2 C flour
1/2 C packed dark brown sugar
1/2 C chopped pecans


Directions: Preheat oven to 375 degrees. Take frozen pie dough out to thaw for about 15 minutes so it doesn't crack when you unroll it. Combine ingredients for filling in a large bowl in the order given. Press pie dough into 8' pie pan, and fold over extra on the edges to crimp into the edge of the crust. Place foil on top of the dough and add ceramic pie weights or beans (to keep the crust from bubbling). Bake the crust for 10-12 minutes, until lightly browned. Remove and let cool. Meanwhile, make the streusel topping. Combine flour and sugar, then cut in cold butter using a pastry cutter or two forks. Stir in chopped pecans and set aside.

Pour filling into the cooled pie crust and bake for about 35 minutes. Add streusel topping and baking for an additional 15-20 minutes. If the edge of the crust starts getting too brown, make a foil shield around the edge during the last part of baking! Remove from the oven and let cool for at least 1 hour.

Tuesday, November 23, 2010

Peanut Butter Cup(cakes)

I've always maintained that the most genius combination of flavors ever discovered is peanut butter and chocolate. Some may call it unsophisticated - but I call it delicious! This last week, I was lucky enough to receive a little sis in my sorority, and lucky for me (and her), her favorite candy is Reese's peanut butter cups. What better project for me to undertake than to recreate it in cupcake form?

The peanut butter cupcake comes from a previous recipe I used from Martha Stewart, and it is just plain fantastic. It gets dry and crumbly if you bake it just a little too long, so make sure you bake them just until the top of the cupcake springs back to the touch. Also, be sure to use homogenized peanut butter (not the kind that has the oil separated on top) because otherwise it will separate in the batter too.

As for the frosting, I found a recipe for a dark chocolate ganache frosting that is absolutely divine. It hardens to a ganache texture when it cools because there is so much chocolate in it, so if you're looking for a soft creamy frosting this isn't it. However, it tastes like the inside of a truffle - and that on top of a peanut butter cupcake is hard to beat.

Peanut Butter Cupcakes
See my PB&J Cupcake post!

Chocolate Ganache Frosting
From How Sweet It Is


For ganache:

12 oz. milk or dark chocolate  (I can only use dark!)
1/2 cup heavy cream
4 tbsp butter
1 tsp vanilla

For frosting:
1/2 cup butter
3-4 cups powdered sugar

Directions: In the top of a double boiler, melt the chocolate almost completely, stirring often. 
Remove from the heat and stir until fully melted.  Gradually add the heavy cream and stir to incorporate into the chocolate until smooth. Allow to cool to touch, about 30 min. When cooled, gently stir in softened butter 1 tbsp at a time.  Stir in vanilla.  

Allow to cool for a few hours. Whip butter in bowl of a stand mixer, then add chocolate ganache.  If it's too thick, slowly reheat in the microwave until it's smooth.  Slowly mix the two on low speed. Gradually add powdered sugar until desired consistency is reached.

Monday, November 15, 2010

Foodie tourism

In between classes and work, I've had the chance to do a little bit of foodie vacationing and soul restoring :) There is nothing that makes me happier than taking some time off from my busy life and having a new food "experience." I'm always trying to get better at baking and food photography, so I love the chance to experiment.

I couldn't pass up the opportunity to celebrate San Diego Beer Week with a chocolate and beer tasting at Stone Brewery in Escondido. Renowned beer expert and the brewery's beverage manager"Dr." Bill Sysak created a five-course tasting menu with three truffles and two beers per course. Needless to say, it was an exercise in decadence - and self-restraint! I was definitely there for the chocolate, and to sip some beers and learn more about the different types of brews.


Three local chocolatiers  - Eclipse ChocolatChuao Chocolatier and Guanni Chocolates - provided the exceptional sweets. There was everything from pumpkin spice with muscovado sugar to cognac to pink peppercorns, and while I didn't love all of them, it was amazing to see the little works of art that these chocolatiers were creating in each truffle.


The town of Julian, about 30 minutes northeast of San Diego, is a historic gold mining town known for its amazing apple pie. Of course, we had to check it out for ourselves - and were not disappointed! Julian Pie Company is the place to be, and we picked out two warm slices with a big scoop of vanilla ice cream on top. 
The pie company was very casual and luckily made up in taste what it lacked in decor. We stood in line and ordered our pies from the counter, picked it up at a window on a paper plate on a plastic tray, and ate on stools at the countertop along the window. I would have liked to sit at a table, but I was soon distracted by the holy grail of San Diego pies.


The Original Apple was a flawless blend of crisp, buttery and flaky crust
with warm, gooey, spicy apple filling. 
The Apple Mountain Berry was a combination of raspberry, strawberries,
boysenberries and apples topped with a streusel cinnamon sugar crumble. 


Heaven? I think so...

Saturday, November 6, 2010

Layers

I've always loved the creative potential of layered bar cookies, and have previously experimented with different combinations of flavors, textures and colors with very delicious results. When I saw Trader Joe's new cranberry apple butter the other day, along with the first appearance of fresh cranberries in the produce aisle, the wheels in my head started turning and I knew it was only a matter of time before I was pulling a cranberry layer bar out of the oven! 


I decided to go with a classic shortbread crust for the bottom layer, and then a simple ribbon of cranberry apple butter in the center. Through some negotiation with my cupboard, the top layer became a fudgy but very light white chocolate-cranberry blondie. I had some doubts about the finished product, but it is hands-down the best thing I've made in months. If you're looking for a wintery dessert full of tart flavor balanced by white chocolate sweetness, don't miss this one :)


Cranberry White Chocolate Bars
1. Make shortbread dough, press into 8" square pan (prepared with parchment or nonstick spray) and prick all over with a fork. Bake for 10-12 minutes or until the dough is slightly browned on the edges.
2. Spread a substantial layer of Trader Joe's cranberry apple butter on top of the shortbread (it will take almost the whole jar).
3. Spread the blondie batter on top, stretching to cover the entire top surface. 
4. Spread fresh or frozen cranberries on very top, press down slightly to set them.
5. Bake at 375 degrees for about 30-40 minutes, or until the top layer has puffed up, is slightly browned and the center is set.


Whole Wheat Shortbread
Adapted from Cate's World Kitchen

1 C whole wheat flour
3 Tbsp sugar
1 Tbsp powdered sugar
1/4 tsp salt
1/2 C (1 stick) unsalted butter, cut into small pieces and chilled
1 egg yolk, lightly beaten


Directions: Toss the sugars, salt, and flour together in a medium bowl. Use a pastry cutter or forks to blend in the butter until the mixture looks like coarse meal. Stir the egg yolk in and mix with a fork just until combined (the dough will be crumbly), then press into the prepared pan. 


White Chocolate Blondies
Adapted from Everything Nice


1/4 C butter
3/4 C white chocolate chips
1/2 C sugar
1/4 C brown sugar
1 C whole wheat pastry flour
1/2 teaspoon baking powder
1/2 teaspoon salt
2 eggs
Directions: Melt butter in microwave safe bowl. Stir in white chocolate chips until melted and smooth. Combine the sugar, brown sugar, flour, baking powder and salt. Beat the eggs until combined, then add in dry ingredients and the white chocolate mixture. Mix until just combined.

Wednesday, November 3, 2010

Dynamic duo

There comes a time every few weeks when I feel very adventurous. Like, have a mocha instead of a cappuccino, go out on a Tuesday, be a rebel and skip class kind of feeling. Frightening, I know. It was one of those days recently, and I decided to run a little kitchen experiment combining two fantastic flavors of the season that are rarely seen together in the wild - maple muffins and pumpkin cheesecake! 

The result, while not perfect, was inspiring enough to call it a success. My biggest mistake, which is easy to do with a stand mixer, was to let the liquid ingredients in the muffin batter whisk for too long. Don't be tempted to whisk for the heck of it - it will dry out the batter a lot and make for a so-so result. Also, don't skimp on the maple extract. Without it, you won't get the same maple flavor in the muffin. It won't be bad, but just not maple. 

Because these have cheesecake in them, be sure to refrigerate them after they cool. However, as a rule, refrigerating dries out baked goods. Moral of the story? Eat them all right out of the oven.

Maple Pumpkin Cheesecake Duo Muffins
1. Make the following recipes for Maple Muffins and Pumpkin Cheesecake and have both ready with the oven preheated to 450 degrees.
2. Prepare the muffin tin with paper liners or nonstick spray. Fill each 1/3 full of muffin batter, then add a large dollop of cheesecake. Top with more muffin batter until the molds are about 3/4 full (can be a little more).
3. Bake until the tops of the muffins spring back to the touch, about 10-15 minutes.


Maple Muffins

2 C whole wheat pastry flour
1 1/2 tsp baking powder
1/2 tsp baking soda
1/4 tsp salt
1 tsp cinnamon
2 eggs
1 egg white
1/2 C pure maple syrup
1 tsp maple extract
1 C milk
1/3 C unsweetened applesauce

Directions: Preheat oven to 450 degrees. In a large bowl, whisk together the flour, baking powder and soda, salt, and cinnamon. Set aside. Whisk together eggs and egg white, then add maple syrup, maple extract, milk and applesauce. Whisk until smooth, but NO LONGER. Stir in dry ingredients until just combined. 

Pumpkin Cheesecake

4 oz. cream cheese
1/8 C granulated sugar
1/4 C brown sugar
1/8 C whipping cream
1/2 tsp vanilla extract
7 oz. pumpkin puree
1/4 tsp cinnamon
1/8 tsp allspice
1/8 tsp cloves
pinch of cardamom

Directions: Beat together cream cheese, sugars, cream and vanilla until smooth. Add the pumpkin puree, cinnamon, allspice, cloves and cardamom. Blend until smooth.

Monday, October 18, 2010

A bite of fall

I have a weakness for crisp air, a little bit of rain, red and orange leaves and shortened days. Fall is by far my favorite season, not least because it seems to just require cinnamon, nutmeg, pumpkin and often a little bit of chocolate. I'm definitely mentally preparing for the Christmas season, but there's a lot to be said for relishing the season in between summer and winter and all the fantastic flavors that beg to be brought to life.
Pumpkin is an interesting ingredient to use, because it adds a lot of moisture and lightness to the texture as well as a certain sweetness. Plus, it is super healthy (it's orange!) and contains lots of fiber and vitamins A and C. What's not to love?
This cookie recipe is a little bit tweaked from the original, and I think it is one of my favorite in my repertoire. It definitely got rave reviews, and I would recommend making enough to share :)

Pumpkin Chai Chocolate Chip Cookies
Adapted from The Culinary Couple
Yields about 2 dozen cookies

2 C whole wheat pastry flour
1 1/2 C old-fashioned oats
1 tsp baking soda
2 tsp chai spice blend (2 parts cardamom, 2 parts ginger, 1 part cinnamon, 1 part nutmeg, 2/3 part cloves, 2/3 part nutmeg, 2/3 part allspice, 1/3 part white pepper)
1/2 tsp salt
1 C (2 sticks) butter, softened
1 1/2 C packed brown sugar
1/2 C granulated sugar
1 C pumpkin puree
1 egg
1 tsp vanilla extract
1 C dark chocolate chips
raw sugar

Directions: Preheat oven to 350 degrees. Line baking sheet with parchment. Combine flour, oats, baking soda, spices and salt and set aside. Beat butter and sugars in a large bowl until light and fluffy. Add pumpkin, egg and vanilla, mix well. Add flour mixture and combine until all ingredients are incorporated. Fold in chocolate chips. Drop rounded tablespoons onto baking sheet and sprinkle with raw sugar. Bake for 12-14 minutes, or until cookies are lightly browned.


Wednesday, October 6, 2010

Cake on ice

Sometimes life doesn't turn out the way you planned. Actually, most of the time life throws you curveballs - and it's no different in the kitchen. It was my beautiful roommate Emma's 21st birthday, and I wanted to do something special for the occasion. My only guideline was that it needed to include blueberries, so I picked out a recipe for a jelly roll cake rolled with a blueberry cream cheese filling. However, because of the moisture added by the frozen blueberries in the frosting, it was too runny, and the cake stuck to the towel I was using to roll it into the jelly roll shape. I was literally left with a giant pile of cake and purple frosting, and not many ideas on how to proceed except to the trash can. For some reason, I grabbed a bowl and started layering cake and frosting until I had a kind of trifle or parfait, then covered it and stuck it in the freezer.

When I finally gathered the courage to look at the giant mess I'd made of the original recipe, I discovered a very pleasant kind of frozen dessert that I had no problem eating with a big smile on my face. The cream cheese frosting soaked nicely into the sponge cake layers, and then the whole mix froze into a texture similar to ice cream - I scooped it with an ice cream scooper! The blueberry and cream cheese flavors complement the sweetness of the cake well, and overall I thought the entire (accidental) endeavor was a rousing success. At least that's what I gather from the empty bowl now in the sink...

Frozen Blueberry Cake
Directions: Tear up sheet of genoise cake into small-ish chunks (about 2-inch squares are perfect) and layer along the bottom of a large bowl. Alternate layers of cream cheese frosting and torn up cake until everything is used up. Throw in extra blueberries if you choose, the more the better! Cover and freeze until the frosting is the consistency of ice cream. The best way to serve is to scoop the cake out with an ice cream scooper and serve in a bowl (or martini glass!) with a spoon.

Genoise (sponge) Cake
Adapted from Betty Crocker
Makes one half-sheet of thin cake

3 eggs
1 C granulated sugar
1/3 C water
3/4 C all-purpose flour
1 tsp baking powder
1/4 tsp salt

Directions: Heat oven to 375 degrees. Line a baking sheet with a silicone sheet, parchment or foil. In a large bowl, beat eggs on high speed until thick and pale yellow (about 5 minutes). Gradually beat in sugar. Beat in water on low speed, then gradually add flour, baking powder and salt. Beat just until batter is smooth and pour into pan. Bake for 12-15 minutes or until the top of the cake springs back to the touch and it's slightly golden.

Blueberry Cream Cheese Frosting
Makes more than enough for this recipe - but keeps well in the fridge for a couple of days!

8 oz cream cheese, softened
1/4 C butter, softened
1 C powdered sugar
1/2 tsp vanilla extract
1 bag of frozen blueberries, thawed and strained

Directions: In a large bowl, cream together the cream cheese and butter. Add vanilla and gradually beat in powdered sugar. Beat in blueberries, trying not to add too much extra liquid. The frosting will turn a lovely shade of purple and have a thinner consistency because of the moisture from the blueberries.